As part of my recent experiments in pushing my Epson v550 to the limit, I needed to figure out what settings in the Epson scan software were the best to use. I’ve made over 30GB of test scans, testing every single setting in Epson scan to discover what works and what doesn’t. I’ve produced quite a solid method that should apply to most Epson setups. I’ll avoid talking too much about physical techniques here, I’ve made an entire video going over how to tune your film holding solution to get the best possible scans.
First of all the basic settings. Your document type should be set to film, and the film type should ALWAYS be set to Positive Film. Epson scan can do an OK job inverting negatives for you, but I suggest using other software to perform the inversion if you want to get the most out of your scans. If you have a v7xx/v8xx then you should be using the "film with film holder" settings to activate the "high resolution” lens.

When scanning color film your “image type” setting should be 48-bit color. If you are scanning black and white film then set this to 16-bit grayscale. Some people claim that scanning black and white photos in 48 bit color, then extracting a single channel gives better results. These people are probably full of shit. I’ve tested this method and not only is it extremely tedious but I was unable to find any noticeable difference at all. It could be certain black and white or infrared film gets better results this way but if you are scanning normal silver based black and white film I’d say don’t waste your time on anything other than 16bit grayscale. You should also be using uncompressed tiff’s for your output files.
Next up is resolution. For flatbed scanners and in the Epson scan software, resolution refers to the file output size from the scanner. This setting will determine the number of dots or more accurately, the pixels per inch of your file. There is another use of the word resolution when talking about flatbed scanners. This term refers to how detailed or “sharp” the image is, most people call this “effective resolution” but you shouldn’t use that term. Go read the previous article about Epson flatbed resolution to get a better understanding of this since it is quite a complex topic.
To get the best scans from a flatbed scanner you need to know the ideal focal height above the scanner’s glass so you can position your film. You also must have your film perfectly flat. With both of these things taken care of you should scan at the highest dpi setting you can without getting issues. Personally I only use 4800dpi since 3200dpi just doesn’t give me enough pixels to work with and 6400dpi gives me noticeable chromatic aberrations. The settings in Epson scan above 6400dpi are interpolated (upscaled). These should probably be avoided except for very niche situations.

The other settings in the destination panel are not important and should be ignored for the most part. Below this is the Adjustments panel. On the top you have 5 square buttons. The first button from the left is the auto exposure button, you don’t really ever want to use this. The next button is the histogram adjustment, it is very important but I will come back to it later when I talk about color. Next is the tone correction. Open this up and set the tone curve to “Linear” in the drop-down menu, this is VERY important! Finally there is the image adjustment button, almost all of the settings here should always be on ZERO! With one exception that I will discuss below. Ignore the 5th grayed out button it isn’t important.
Below the buttons are the “effects” ALL of these are not only worthless but can actually ruin your image except for Digital ICE and Unsharp mask. You never ever want to enable grain reduction, color restoration, backlight correction, or dust removal. For color film I recommend always using Digital ICE. ICE does a great job removing dust, it isn’t perfect and I wish I could extract the raw infrared channel to use in better spot removal software but it gets the job done for the most part. You CANNOT use digital ice on black and white film, or at least you shouldn’t because it crushes the blacks of your image.
Unsharp mask is optional, and I personally recommend against it unless you don’t plan on doing edits to your scans beyond the inversion. Below is a comparison of an image with no unsharp mask, and an image with unsharp mask on high. You should never use high if you are going to use it, stick with medium at most.

This may look like incredible results, however upon closer inspection it really isn’t that great. Ideally you would be performing deconvolution based input sharpening on your image, followed by creative sharpening (such as unsharp mask), and then output sharpening. Doing so will give far better results than what just Epson can provide and it will also give you a chance to do significant editing to the photo before applying sharpening.
Remember unsharp mask is creative sharpening, it simply creates the illusion of sharpness by boosting contrast around edges of the image. Editing a photo that has been sharpened this way is also going to edit those contrast boosted edges and can lead to poor results. You can achieve results BETTER than Epson's unsharp mask by doing the sharpening yourself. Below is the original unsharpened image which I have performed deconvolution and unsharp mask on manually compared with the same image that used Epson's unsharp mask.


They look practically identical but when zoomed in you can see my manual sharpening preserves more detail, and produces far less artifacts. The example here was from an older attempt, go watch my post processing video where I do the sharpening and comparison in real time. You can REALLY see the difference in the video and I use settings which induce slightly less noise than this one. Next is the most important discussion of the article, COLOR. First you are going to want to go to the bottom of epson scan and open the configuration settings window.
The only thing you need to really worry about is the color tab. You have three settings here: color control, ICM, and no color correction. Color control and ICM are practically identical by default, but I recommend using ICM mode. ICM mode gives you the option to use a color chart to build a custom source color profile for your scanner. Otherwise by default it uses the profile that comes with the scanner’s drivers and converts it to sRGB which is the universal standard color format.
No color correction is another very valid option. No CC mode disables all of the adjustment options but gives you a totally flat untouched negative. For black and white film I recommend scanning in No CC mode. For color film I stick with ICM because I want access to Digital ICE, however no CC mode with color film seems to produce the least amount of color noise after the negative inversion.
Continuing with ICM mode, it is time to cover the histogram and image adjustment settings. By default your histogram is going to have the input and output values clamped in slightly. IMO the output values should always be unclamped, to do this simply set the boxes to 0 and 255 respectively or just drag the sliders to the edges. Do the same for the input, leaving the center point at 1.00 to get what I call “fully unclamped”. This should in theory give you the flattest possible image out of Epson scan. Make sure your little tone curve below the histogram is also set to linear for both. It should look like this:

Now in most situations I would say this is perfectly fine and gives decent results. However many people including Nate the author of Negative Lab Pro say lowering the saturation to -27 in the image adjustment window gives better results. Other people also say that clamping the input is better too especially for slide film. I’ve decided to run some tests with different settings and different inversion software to decide which is actually better.
I am doing this on the worst case scenario film. Kodak Gold 200 that was expired and kept in a hot attic for an unknown number of years before shooting it. The film itself has turned magenta and it is a miracle there is even any color left in this stuff. Weird expired film like this always produces more inversion artifacts so the following comparison is showing the extreme of what these settings can alter. In reality you will likely get usable results no matter what and you can always fix stuff in post.
| Inversion | No CC | ICM UC | ICM UC -27 | ICM UC -24 | ICM CLAMPED -27 |
| Orig |  |
 |
 |
 |
 |
| Manual |  |
 |
 |
 |
 |
| G2P |  |
 |
 |
 |
 |
| NLP |  |
 |
 |
 |
 |
I made five scans: No CC mode, ICM unclamped (input&output for all), ICM unclamped with -27 saturation, ICM unclamped with -24 saturation, and ICM with a clamped input and -27 saturation. I tested these with 3 inversion methods: Manually inverting, Grain 2 Pixel, and Negative Lab Pro.
I would take my manual inversions with a grain of salt since each one is done by eye. G2p has practically no inversion settings, and NLP used all default standard settings. Typically when I use NLP I will set the tones to linear and that gives me much better results. Remember this is all just comparing the direct inversion, any of the issues in these scans could be corrected with a small amount of post processing.
| Crop | No CC | ICM UC | ICM UC -27 | ICM UC -24 | ICM CLAMPED -27 |
| Manual |  |
 |
 |
 |
 |
| G2P |  |
 |
 |
 |
 |
| NLP |  |
 |
 |
 |
 |
NLP is the most consistent across all of the scans. G2p seems to really struggle with the unclamped ICM scan. The -27 sat scan seems to be ever so slightly more magenta overall or maybe the -24 is ever so slightly more green, ironically my manual inversion gave the opposite results but again that was just my error.
Why -24? well I noticed Epson scan will do +24 saturation when using some of the other settings like color restoration and I wondered if maybe the software does 24 extra saturation on the ICM mode images by default. I suppose decompiling the software or analyzing the Epson color profile could give some concrete answers, but for now I’d say they are functionally identical.
I found manually inverting the input clamped scan to be FAR easier than the other scans. The no cc scan came out very good in the manual inversion as well. The most important thing though is color noise performance. No CC mode is flawless with practically no color noise in any of the inversion methods. This is followed by the input clamped ICM scan which has ever so slightly more noise than the no cc scan.
All of the unclamped scans have noticeable color noise with the straight ICM UC being the worst. Remember though, this heat damaged or expired film will cause this kind of thing to happen, normal film will probably perform perfectly fine using ICM UC -27 or -24.
Just to make sure it wasn’t a fluke I also scanned a black and white image using no CC mode, ICM fully unclamped, and ICM with a clamped input. Each scan was manually inverted but I tried to match them all as close as possible. Each cropped section uses a different exposure and contrast adjustment to FORCE any possible differences to come out. The Full image has contrast in a way where I would apply it for a final image, the pipes image is untouched, the tank is heavily under exposed, and the sky image is extremely underexposed to bring out as much detail in the clouds as possible.
| BnW | No CC | ICM UC | ICM CLAMPED |
| Full |  |
 |
 |
| Pipes |  |
 |
 |
| Tank |  |
 |
 |
| Sky |  |
 |
 |
In a normal workflow I would say these 3 scans are functionally identical. Most people would never be able to tell the ICM scans apart on the tank crop example but there are extremely minor differences. In the sky crop the unclamped ICM scan once again had the worst noise performance, but this time the input clamped ICM scan seems to be the best.
I can’t tell if the input clamped ICM scan or the no CC scan has the best dynamic range but again these are examples that are designed to push the differences out, and even then they are so minor it probably doesn't matter. My opinion is: if you are willing to clamp, then do it. That is the subject of the last section of this article.
Clamping a scan in the Epson scan software can be quite difficult. The histogram adjustment by default shows an average of each color channel. You could go through and clamp each color channel individually and it may or may not be better. Currently I only clamp the main RGB input channel. To do this properly without clipping anything I will go and select each individual channel and make a note at where the histogram cuts off for each channel. I will then bring in the whites and blacks of the main rgb channel in just enough so that no channel is being clipped and I try to leave some space on each side of the histogram.
Below is an example of how clamping the RGB channel too much will cause the red and blue channels to clip.
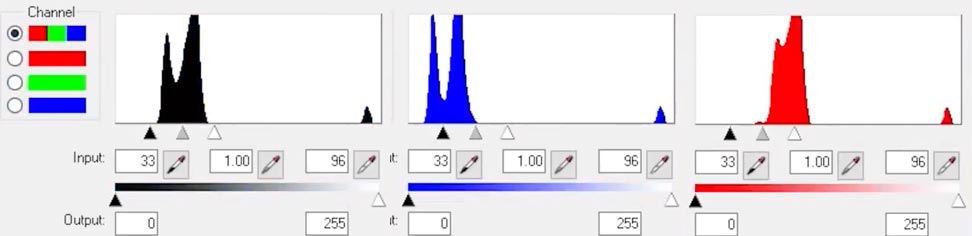
Remember when doing input clamping you want to be very lenient, the Epson scan software does NOT do a good job at showing you what data is truly there so you want to clamp less than you think you should. Output clamping is a different story but I would recommend leaving it unclamped at 0 and 255. There may be cases where clamping the output a bit will give better results but I haven't found a good way to test this yet, and logically it seems like it would reduce dynamic range in any situation.
Also remember no color correction mode gives great results and if you can deal with dust in some way (such as wet mounting) then that might be the way to go. It is also twice as fast since digital ICE doubles the per frame scan time. Originally I came to the conclusion that clamping your input did not give any noticeable results, however I came to this conclusion testing black and white photos since that is what I mostly scan. Sadly I ended up putting this conclusion in a video I made on this topic that covers a lot of what this article goes over. So hopefully this article will serve as an addendum to that video.
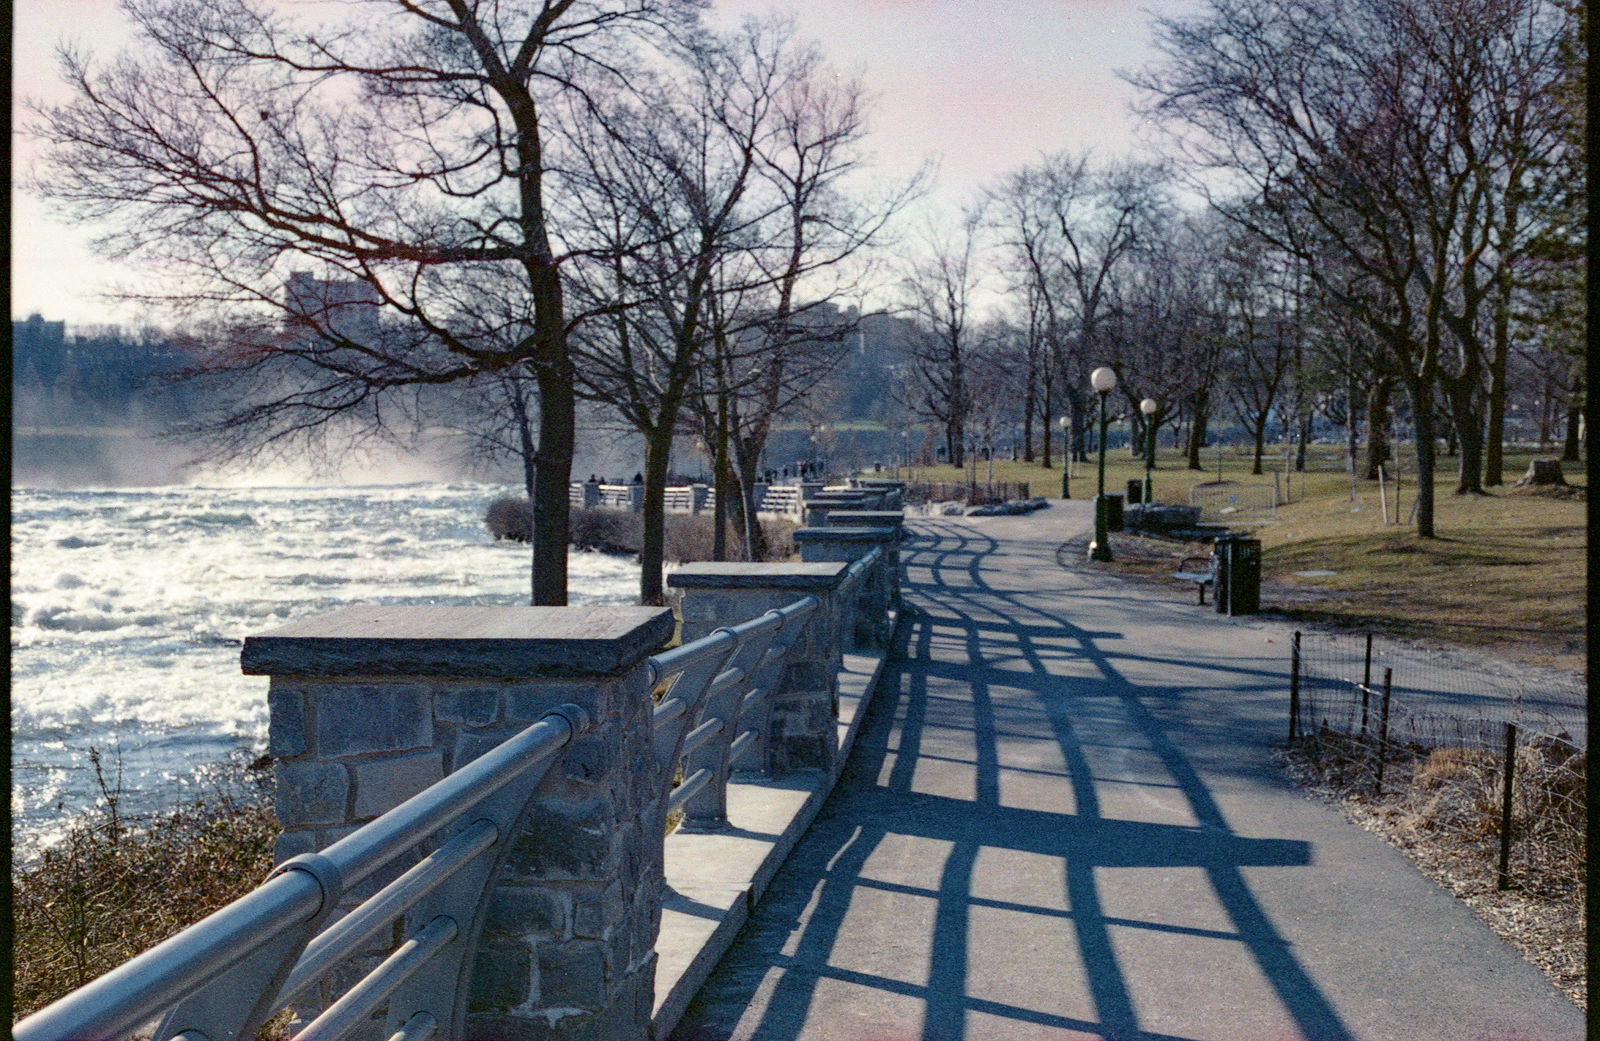
Here is the final edit of the color photo. This was made using the input clamped ICM -27 sat scan, inverted with NLP but this time using the linear tone options and the warming color mode setting. I did a few other edits in camera raw and applied a proper sharpening pipeline to get this result.